前言:虽然Async hooks至此还是实验性API,但是他的确可以解决应用中的一些问题,比如日志和调用栈跟踪。本文从应用和原理方便介绍一下Node.js的Async hooks。
1 env中的AsyncHooks
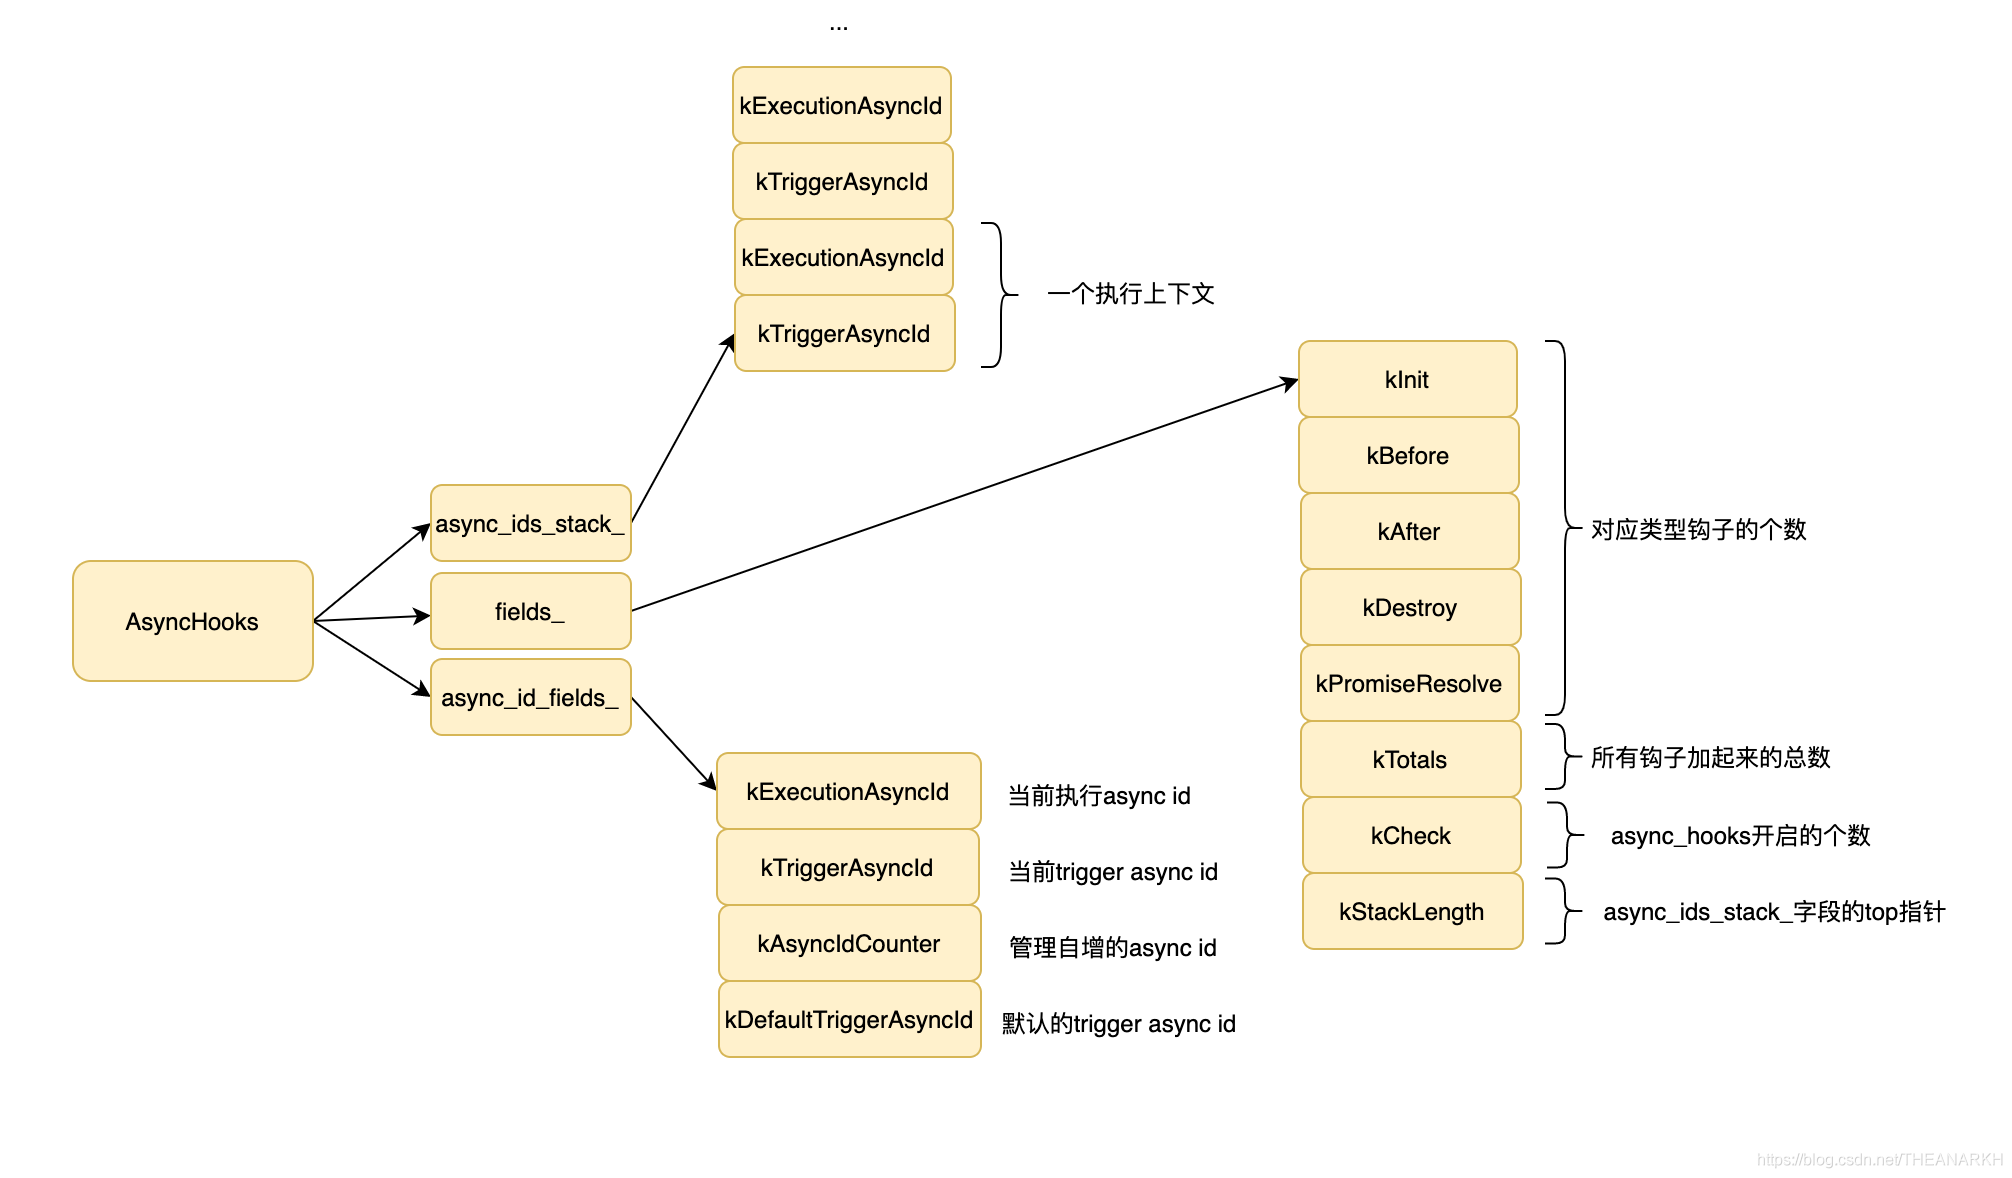
在Node.js的env对象中有一个AsyncHooks对象,负责Node.js进程中async_hooks的管理。我们看一下定义。
1.1 类定义
 1
 2
 3
 4
 5
 6
 7
 8
 9
10
11
12
13
14
15
16
17
18
19
20
21
22
23
24
25
26
27
28
29
30
31
32
33
34
35
36
37
38
39
40 | class AsyncHooks : public MemoryRetainer {
public:
enum Fields {
// 五种钩子
kInit,
kBefore,
kAfter,
kDestroy,
kPromiseResolve,
// 钩子总数
kTotals,
// async_hooks开启的个数
kCheck,
// 记录栈的top指针
kStackLength,
// 数组大小
kFieldsCount,
};
enum UidFields {
kExecutionAsyncId,
kTriggerAsyncId,
// 当前async id的值
kAsyncIdCounter,
kDefaultTriggerAsyncId,
kUidFieldsCount,
};
private:
inline AsyncHooks();
// 异步资源的类型
std::array<v8::Eternal<v8::String>, AsyncWrap::PROVIDERS_LENGTH> providers_;
// 栈
AliasedFloat64Array async_ids_stack_;
// 整形数组,每个元素值的意义和Fields对应
AliasedUint32Array fields_;
// 整形数组,每个元素值的意义和UidFields对应
AliasedFloat64Array async_id_fields_;
};
|
 接下来看一下env的AsyncHooks对象提供了哪些API,这些API是上层的基础。
 1.2 读API
我们看一下env对象中获取AsyncHooks对象对应字段的API。
 1
 2
 3
 4
 5
 6
 7
 8
 9
10
11
12
13
14
15
16
17
18
19
20
21
22
23
24
25
26
27
28
29
30
31
32
33
34
35
36
37
38
39
40
41
42 | // 获取对应的字段
inline AliasedUint32Array& AsyncHooks::fields() {
return fields_;
}
inline AliasedFloat64Array& AsyncHooks::async_id_fields() {
return async_id_fields_;
}
inline AliasedFloat64Array& AsyncHooks::async_ids_stack() {
return async_ids_stack_;
}
// 获取资源类型
inline v8::Local<v8::String> AsyncHooks::provider_string(int idx) {
return providers_[idx].Get(env()->isolate());
}
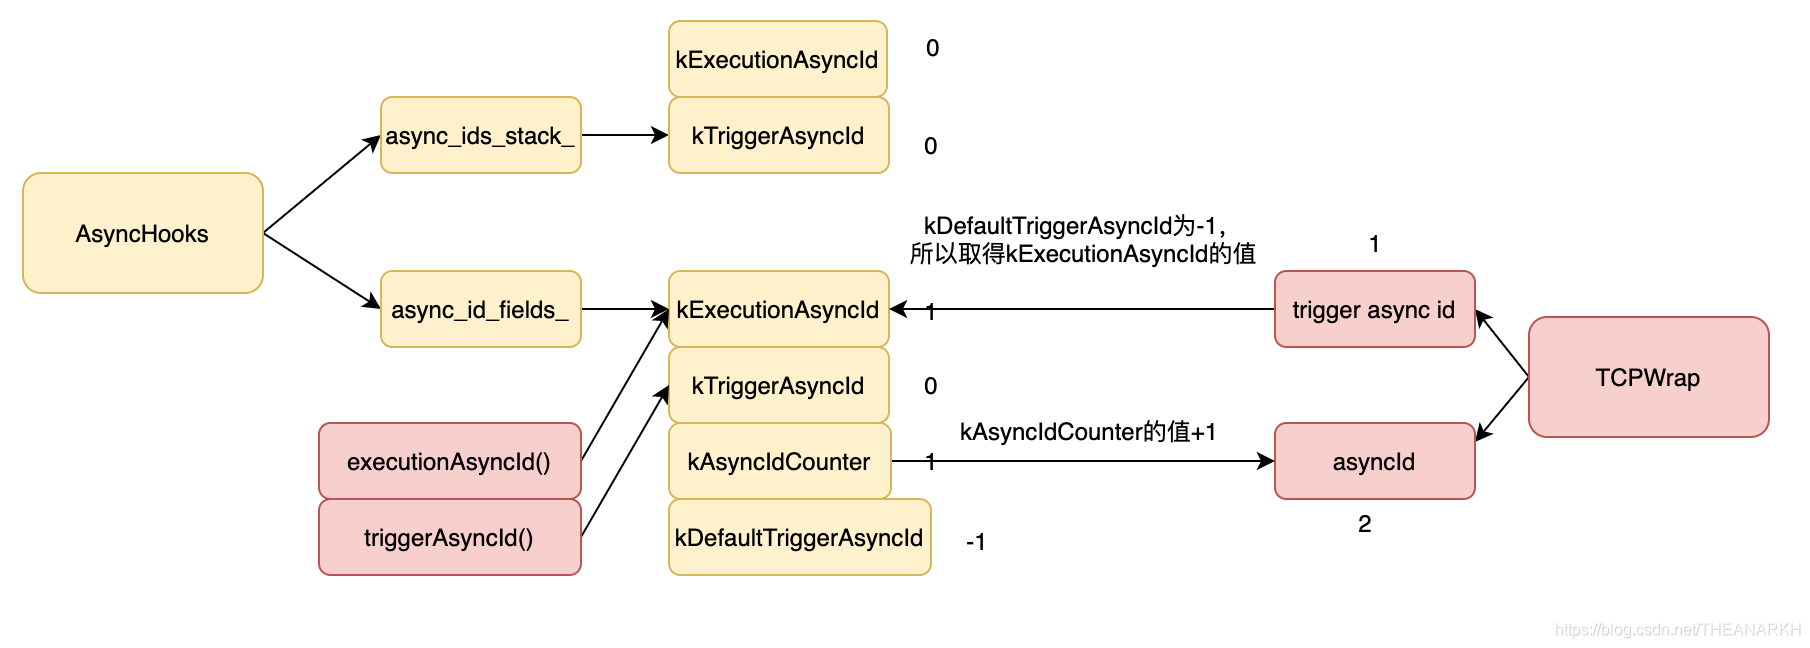
// 新建资源的时候,获取新的async id
inline double Environment::new_async_id() {
async_hooks()->async_id_fields()[AsyncHooks::kAsyncIdCounter] += 1;
return async_hooks()->async_id_fields()[AsyncHooks::kAsyncIdCounter];
}
// 获取当前async id
inline double Environment::execution_async_id() {
return async_hooks()->async_id_fields()[AsyncHooks::kExecutionAsyncId];
}
// 获取当前trigger async id
inline double Environment::trigger_async_id() {
return async_hooks()->async_id_fields()[AsyncHooks::kTriggerAsyncId];
}
// 获取默认的trigger async id,如果没有设置,则获取当前的async id
inline double Environment::get_default_trigger_async_id() {
double default_trigger_async_id = async_hooks()->async_id_fields()[AsyncHooks::kDefaultTriggerAsyncId];
// If defaultTriggerAsyncId isn't set, use the executionAsyncId
if (default_trigger_async_id < 0)
default_trigger_async_id = execution_async_id();
return default_trigger_async_id;
}
|
1.3 写API
 1
 2
 3
 4
 5
 6
 7
 8
 9
10
11
12
13
14
15
16
17
18
19
20
21
22
23
24
25
26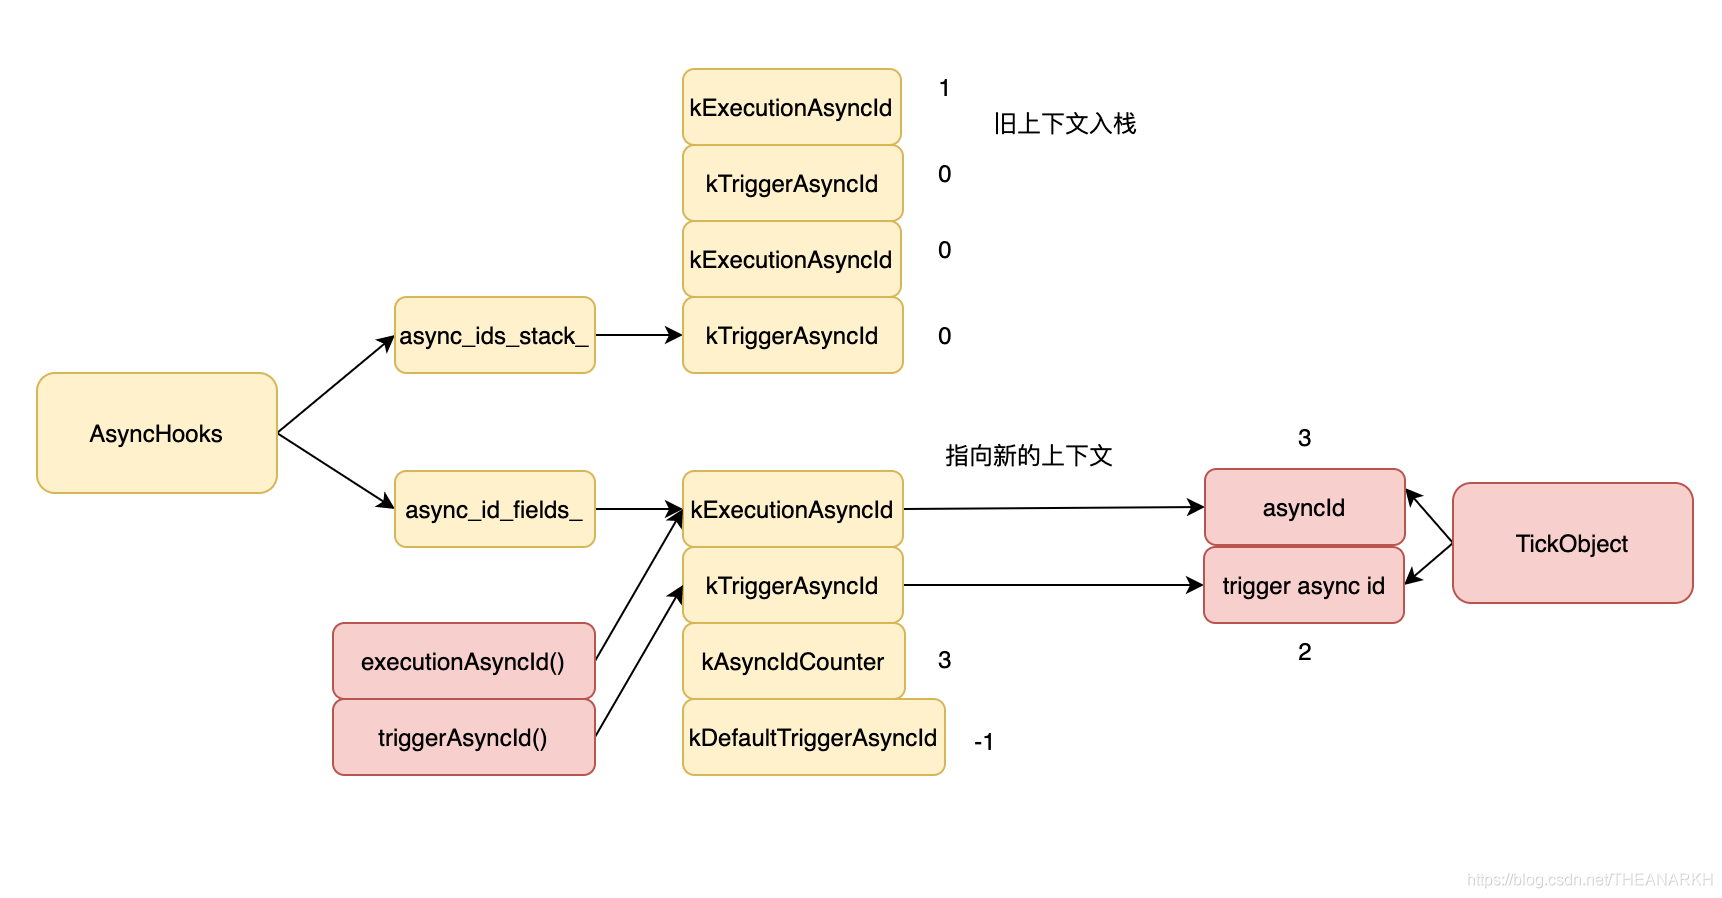
27 | inline void AsyncHooks::push_async_ids(double async_id,
double trigger_async_id) {
// 获取当前栈顶指针
uint32_t offset = fields_[kStackLength];
// 不够则扩容
if (offset * 2 >= async_ids_stack_.Length())
grow_async_ids_stack();
// 把旧的上下文压栈
async_ids_stack_[2 * offset] = async_id_fields_[kExecutionAsyncId];
async_ids_stack_[2 * offset + 1] = async_id_fields_[kTriggerAsyncId];
// 栈指针加一
fields_[kStackLength] += 1;
// 记录当前上下文
async_id_fields_[kExecutionAsyncId] = async_id;
async_id_fields_[kTriggerAsyncId] = trigger_async_id;
}
// 和上面的逻辑相反
inline bool AsyncHooks::pop_async_id(double async_id) {
if (fields_[kStackLength] == 0) return false;
uint32_t offset = fields_[kStackLength] - 1;
async_id_fields_[kExecutionAsyncId] = async_ids_stack_[2 * offset];
async_id_fields_[kTriggerAsyncId] = async_ids_stack_[2 * offset + 1];
fields_[kStackLength] = offset;
return fields_[kStackLength] > 0;
}
|
2 底层资源封装类 - AsyncWrap
接着看一下异步资源的基类AsyncWrap。所有依赖于C、C++层实现的资源(比如TCP、UDP)都会继承AsyncWrap。看看该类的定义。
| class AsyncWrap : public BaseObject {
private:
ProviderType provider_type_ = PROVIDER_NONE;
double async_id_ = kInvalidAsyncId;
double trigger_async_id_;
};
|
2.1 资源初始化
1
2
3
4
5
6
7
8
9
10
11
12
13
14
15
16
17
18
19
20
21
22
23 | AsyncWrap::AsyncWrap(Environment* env,
Local<Object> object,
ProviderType provider,
double execution_async_id,
bool silent)
: AsyncWrap(env, object) {
// 资源类型
provider_type_ = provider;
AsyncReset(execution_async_id, silent);
}
void AsyncWrap::AsyncReset(Local<Object> resource, double execution_async_id,
bool silent) {
// 获取一个新的async id,execution_async_id默认是kInvalidAsyncId
async_id_ = execution_async_id == kInvalidAsyncId ? env()->new_async_id()
: execution_async_id;
// 获取trigger async id
trigger_async_id_ = env()->get_default_trigger_async_id();
// 执行init钩子
EmitAsyncInit(env(), resource,
env()->async_hooks()->provider_string(provider_type()),
async_id_, trigger_async_id_);
}
|
1
2
3
4
5
6
7
8
9
10
11
12
13
14
15
16
17
18
19
20 | void AsyncWrap::EmitAsyncInit(Environment* env,
Local<Object> object,
Local<String> type,
double async_id,
double trigger_async_id) {
AsyncHooks* async_hooks = env->async_hooks();
HandleScope scope(env->isolate());
Local<Function> init_fn = env->async_hooks_init_function();
Local<Value> argv[] = {
Number::New(env->isolate(), async_id),
type,
Number::New(env->isolate(), trigger_async_id),
object,
};
TryCatchScope try_catch(env, TryCatchScope::CatchMode::kFatal);
// 执行init回调
USE(init_fn->Call(env->context(), object, arraysize(argv), argv));
}
|
| const { nativeHooks } = require('internal/async_hooks');
internalBinding('async_wrap').setupHooks(nativeHooks);
|
1
2
3
4
5
6
7
8
9
10
11
12
13
14
15
16
17
18
19
20
21 | static void SetupHooks(const FunctionCallbackInfo<Value>& args) {
Environment* env = Environment::GetCurrent(args);
Local<Object> fn_obj = args[0].As<Object>();
#define SET_HOOK_FN(name) \
do { \
Local<Value> v = \
fn_obj->Get(env->context(), \
FIXED_ONE_BYTE_STRING(env->isolate(), #name)) \
.ToLocalChecked(); \
CHECK(v->IsFunction()); \
env->set_async_hooks_##name##_function(v.As<Function>()); \
} while (0)
// 保存到env中
SET_HOOK_FN(init);
SET_HOOK_FN(before);
SET_HOOK_FN(after);
SET_HOOK_FN(destroy);
SET_HOOK_FN(promise_resolve);
#undef SET_HOOK_FN
}
|
| nativeHooks: {
init: emitInitNative,
before: emitBeforeNative,
after: emitAfterNative,
destroy: emitDestroyNative,
promise_resolve: emitPromiseResolveNative
}
|
| function emitInitNative(asyncId, type, triggerAsyncId, resource) {
for (var i = 0; i < active_hooks.array.length; i++) {
if (typeof active_hooks.array[i][init_symbol] === 'function') {
active_hooks.array[i][init_symbol](
asyncId, type, triggerAsyncId,
resource
);
}
}
}
|
2.2 执行资源回调
当业务代码异步请求底层API,并且底层满足条件时,就会执行上层的回调,比如监听一个socket时,有连接到来。Node.js就会调用MakeCallback函数执行回调。
| MaybeLocal<Value> AsyncWrap::MakeCallback(const Local<Function> cb,
int argc,
Local<Value>* argv) {
// 当前AsyncWrap对象对应的执行上下文
ProviderType provider = provider_type();
async_context context { get_async_id(), get_trigger_async_id() };
MaybeLocal<Value> ret = InternalMakeCallback(env(), object(), cb, argc, argv, context);
return ret;
}
|
1
2
3
4
5
6
7
8
9
10
11
12
13 | MaybeLocal<Value> InternalMakeCallback(Environment* env,
Local<Object> recv,
const Local<Function> callback,
int argc,
Local<Value> argv[],
async_context asyncContext) {
// 新建一个scope
InternalCallbackScope scope(env, recv, asyncContext);
// 执行回调
callback->Call(env->context(), recv, argc, argv);
// 关闭scope
scope.Close();
}
|
1
2
3
4
5
6
7
8
9
10
11
12
13
14
15
16
17
18
19
20 | InternalCallbackScope::InternalCallbackScope(Environment* env,
Local<Object> object,
const async_context& asyncContext,
int flags)
: env_(env),
async_context_(asyncContext),
object_(object),
skip_hooks_(flags & kSkipAsyncHooks),
skip_task_queues_(flags & kSkipTaskQueues) {
// v14版本中,是先触发before再push上下文,顺序是不对的,v16已经改过来。
// 当前执行上下文入栈
env->async_hooks()->push_async_ids(async_context_.async_id,
async_context_.trigger_async_id);
// 触发before钩子
if (asyncContext.async_id != 0 && !skip_hooks_) {
AsyncWrap::EmitBefore(env, asyncContext.async_id);
}
pushed_ids_ = true;
}
|
| void InternalCallbackScope::Close() {
// 执行
if (pushed_ids_)
env_->async_hooks()->pop_async_id(async_context_.async_id);
if (async_context_.async_id != 0 && !skip_hooks_) {
AsyncWrap::EmitAfter(env_, async_context_.async_id);
}
}
|
3 上层资源的封装 - Timeout、TickObjecd等
并不是所有的异步资源都是底层实现的,比如定时器,tick也被定义为异步资源,因为他们都是和回调相关。这种异步资源是在JS层实现的,这里只分析Timeout。
3.1 创建资源
我们看一下执行setTimeout时的核心逻辑。
1
2
3
4
5
6
7
8
9
10
11
12
13
14
15
16
17 | function setTimeout(callback, after, arg1, arg2, arg3) {
const timeout = new Timeout(callback, after, args, false, true);
return timeout;
}
function Timeout(callback, after, args, isRepeat, isRefed) {
initAsyncResource(this, 'Timeout');
}
function initAsyncResource(resource, type) {
// 获取新的async id
const asyncId = resource[async_id_symbol] = newAsyncId();
const triggerAsyncId = resource[trigger_async_id_symbol] = getDefaultTriggerAsyncId();
// 是否设置了init钩子,是则触发回调
if (initHooksExist())
emitInit(asyncId, type, triggerAsyncId, resource);
}
|
| function emitInitScript(asyncId, type, triggerAsyncId, resource) {
emitInitNative(asyncId, type, triggerAsyncId, resource);
}
|
3.1 执行回调
当定时器到期时,会执行回调,我们看看相关的逻辑。
| // 触发before钩子
emitBefore(asyncId, timer[trigger_async_id_symbol]);
// 执行回调
timer._onTimeout();
// 触发after回调
emitAfter(asyncId);
|
1
2
3
4
5
6
7
8
9
10
11
12
13
14
15 | function emitBeforeScript(asyncId, triggerAsyncId) {
// 和底层的push_async_ids逻辑一样
pushAsyncIds(asyncId, triggerAsyncId);
// 如果有回调则执行
if (async_hook_fields[kBefore] > 0)
emitBeforeNative(asyncId);
}
function emitAfterScript(asyncId) {
// 设置了after回调则emit
if (async_hook_fields[kAfter] > 0)
emitAfterNative(asyncId);
// 和底层的pop_async_ids逻辑一样
popAsyncIds(asyncId);
}
|
4 DefaultTriggerAsyncIdScope
Node.js为了避免过多通过参数传递的方式传递async id,就设计了DefaultTriggerAsyncIdScope。DefaultTriggerAsyncIdScope的作用类似在多个函数外维护一个变量,多个函数都可以通过DefaultTriggerAsyncIdScope获得trigger async id,而不需要通过层层传递的方式,他的实现非常简单。
1
2
3
4
5
6
7
8
9
10
11
12
13
14
15
16
17
18
19
20 | class DefaultTriggerAsyncIdScope {
private:
AsyncHooks* async_hooks_;
double old_default_trigger_async_id_;
};
inline AsyncHooks::DefaultTriggerAsyncIdScope ::DefaultTriggerAsyncIdScope(
Environment* env, double default_trigger_async_id)
: async_hooks_(env->async_hooks()) {
// 记录旧的id,设置新的id
old_default_trigger_async_id_ =
async_hooks_->async_id_fields()[AsyncHooks::kDefaultTriggerAsyncId];
async_hooks_->async_id_fields()[AsyncHooks::kDefaultTriggerAsyncId] =
default_trigger_async_id;
}
// 恢复
inline AsyncHooks::DefaultTriggerAsyncIdScope ::~DefaultTriggerAsyncIdScope() {
async_hooks_->async_id_fields()[AsyncHooks::kDefaultTriggerAsyncId] =
old_default_trigger_async_id_;
}
|
| function defaultTriggerAsyncIdScope(triggerAsyncId, block, ...args) {
const oldDefaultTriggerAsyncId = async_id_fields[kDefaultTriggerAsyncId];
async_id_fields[kDefaultTriggerAsyncId] = triggerAsyncId;
try {
return block(...args);
} finally {
async_id_fields[kDefaultTriggerAsyncId] = oldDefaultTriggerAsyncId;
}
}
|
| // 获取handle里的async id
this[async_id_symbol] = getNewAsyncId(this._handle);
defaultTriggerAsyncIdScope(this[async_id_symbol],
process.nextTick,
emitListeningNT,
this);
|
1
2
3
4
5
6
7
8
9
10
11
12
13
14
15
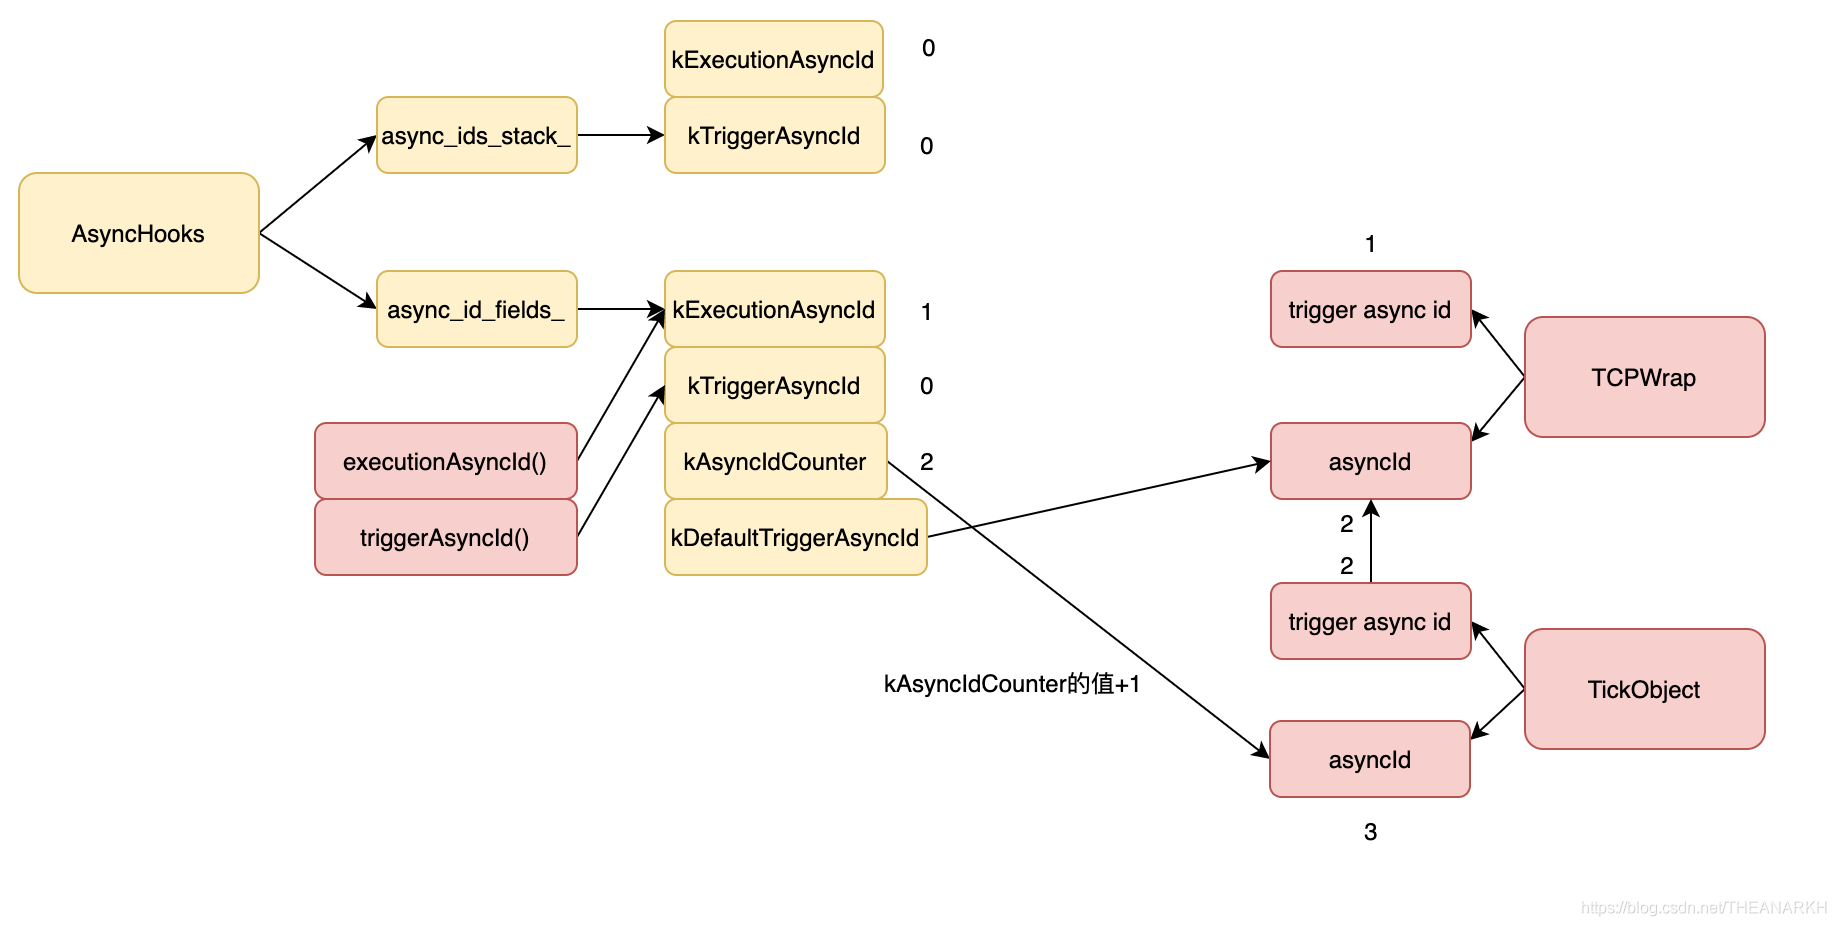
16 | function nextTick(callback) {
// 获取新的async id
const asyncId = newAsyncId();
// 获取默认的trigger async id,即刚才设置的
const triggerAsyncId = getDefaultTriggerAsyncId();
const tickObject = {
[async_id_symbol]: asyncId,
[trigger_async_id_symbol]: triggerAsyncId,
callback,
args
};
if (initHooksExist())
// 创建了新的资源,触发init钩子
emitInit(asyncId, 'TickObject', triggerAsyncId, tickObject);
queue.push(tickObject);
}
|
| function getDefaultTriggerAsyncId() {
const defaultTriggerAsyncId = async_id_fields[kDefaultTriggerAsyncId];
if (defaultTriggerAsyncId < 0)
return async_id_fields[kExecutionAsyncId];
return defaultTriggerAsyncId;
}
|
1
2
3
4
5
6
7
8
9
10
11
12
13
14
15
16
17
18 | function processTicksAndRejections() {
let tock;
do {
while (tock = queue.shift()) {
// 拿到对应的async 上下文
const asyncId = tock[async_id_symbol];
emitBefore(asyncId, tock[trigger_async_id_symbol]);
try {
const callback = tock.callback;
callback();
} finally {
if (destroyHooksExist())
emitDestroy(asyncId);
}
emitAfter(asyncId);
}
} while (!queue.isEmpty() || processPromiseRejections());
}
|
5 资源销毁
资源销毁的时候也会触发对应的钩子,不过不同的是这个钩子是异步触发的。无论是JS还是好C++层触发销毁钩子的时候,逻辑都是一致的。
1
2
3
4
5
6
7
8
9
10
11
12
13
14
15
16
17
18
19
20
21 | void AsyncWrap::EmitDestroy(Environment* env, double async_id) {
// �之前为空则设置回调
if (env->destroy_async_id_list()->empty()) {
env->SetUnrefImmediate(&DestroyAsyncIdsCallback);
}
// async id入队
env->destroy_async_id_list()->push_back(async_id);
}
template <typename Fn>
void Environment::SetUnrefImmediate(Fn&& cb) {
CreateImmediate(std::move(cb), false);
}
template <typename Fn>
void Environment::CreateImmediate(Fn&& cb, bool ref) {
auto callback = std::make_unique<NativeImmediateCallbackImpl<Fn>>(
std::move(cb), ref);
// 加入任务队列
native_immediates_.Push(std::move(callback));
}
|
1
2
3
4
5
6
7
8
9
10
11
12
13
14 | void AsyncWrap::DestroyAsyncIdsCallback(Environment* env) {
Local<Function> fn = env->async_hooks_destroy_function();
do {
std::vector<double> destroy_async_id_list;
destroy_async_id_list.swap(*env->destroy_async_id_list());
// 遍历销毁的async id
for (auto async_id : destroy_async_id_list) {
HandleScope scope(env->isolate());
Local<Value> async_id_value = Number::New(env->isolate(), async_id);
// 执行JS层回调
MaybeLocal<Value> ret = fn->Call(env->context(), Undefined(env->isolate()), 1, &async_id_value);
}
} while (!env->destroy_async_id_list()->empty());
}
|
6 Async hooks的使用
我们通常以以下方式使用Async hooks
| const async_hooks = require('async_hooks');
async_hooks.createHook({
init(asyncId, type, triggerAsyncId) {},
before(asyncId) {},
after(asyncId) {},
destroy(asyncId) {},
promiseResolve(asyncId),
})
.enable();
|
| function createHook(fns) {
return new AsyncHook(fns);
}
|
| class AsyncHook {
constructor({ init, before, after, destroy, promiseResolve }) {
// 记录回调
this[init_symbol] = init;
this[before_symbol] = before;
this[after_symbol] = after;
this[destroy_symbol] = destroy;
this[promise_resolve_symbol] = promiseResolve;
}
}
|
 1
 2
 3
 4
 5
 6
 7
 8
 9
10
11
12
13
14
15
16
17
18
19
20
21
22
23
24
25 | class AsyncHook {
enable() {
// 获取一个AsyncHook对象数组和一个整形数组
const [hooks_array, hook_fields] = getHookArrays();
// 执行过enable了则不需要再执行
if (hooks_array.includes(this))
return this;
// 做些统计
const prev_kTotals = hook_fields[kTotals];
hook_fields[kTotals] = hook_fields[kInit] += +!!this[init_symbol];
hook_fields[kTotals] += hook_fields[kBefore] += +!!this[before_symbol];
hook_fields[kTotals] += hook_fields[kAfter] += +!!this[after_symbol];
hook_fields[kTotals] += hook_fields[kDestroy] += +!!this[destroy_symbol];
hook_fields[kTotals] +=
hook_fields[kPromiseResolve] += +!!this[promise_resolve_symbol];
// 当前对象插入数组中
hooks_array.push(this);
// 如果之前的数量是0,本次操作后大于0则开启底层的逻辑
if (prev_kTotals === 0 && hook_fields[kTotals] > 0) {
enableHooks();
}
return this;
}
}
|
| function enableHooks() {
// 记录async_hooks的开启个数
async_hook_fields[kCheck] += 1;
}
|
1
2
3
4
5
6
7
8
9
10
11
12 | const { createHook, executionAsyncId } = require('async_hooks');
const fs = require('fs');
const net = require('net');
createHook({
init(asyncId, type, triggerAsyncId) {
fs.writeSync(
1,
`${type}(${asyncId}): trigger: ${triggerAsyncId} execution: ${executionAsyncId()}\n`);
}
}).enable();
net.createServer((conn) => {}).listen(8080);
|
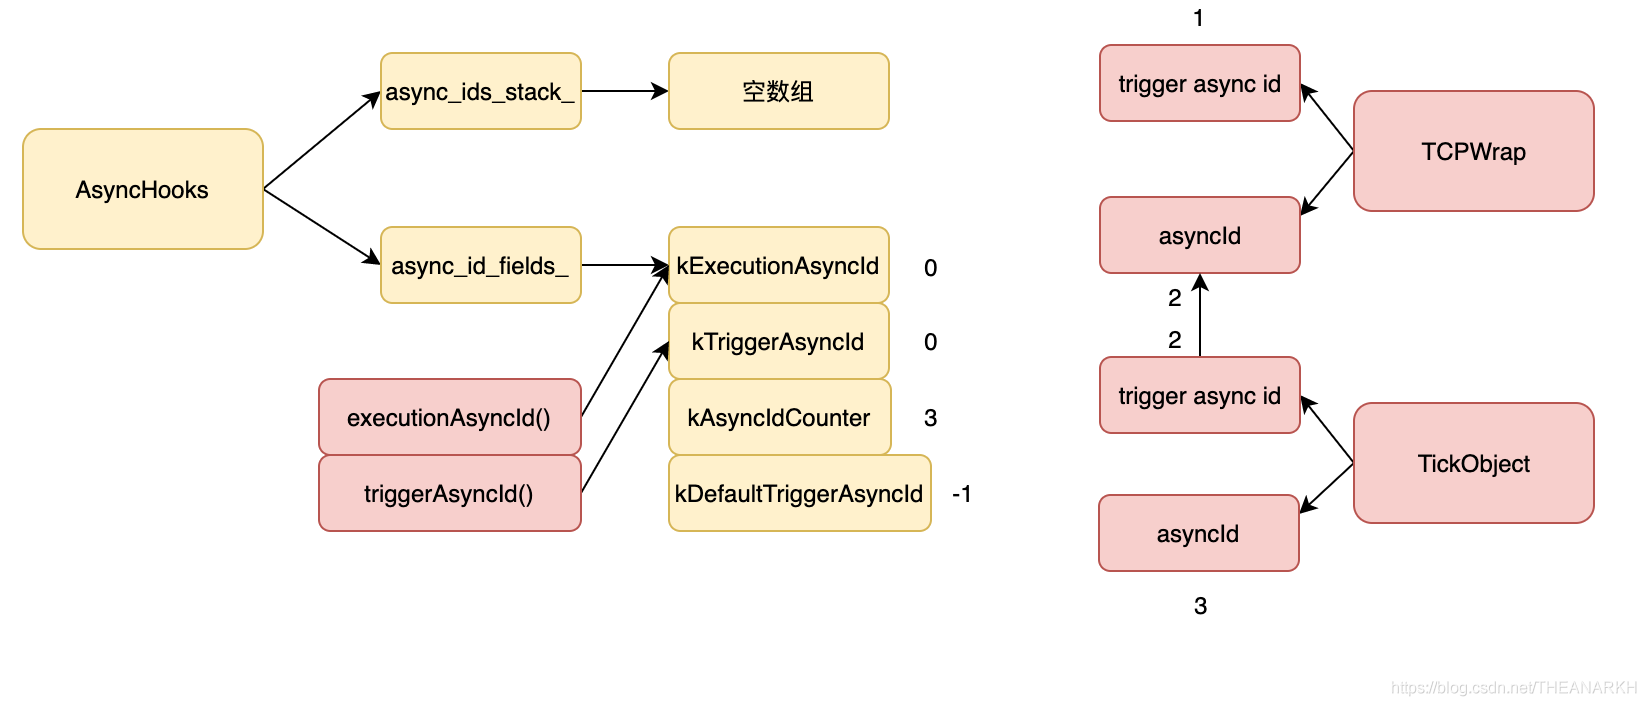
| init: type: TCPSERVERWRAP asyncId: 2 trigger id: 1 executionAsyncId(): 1 triggerAsyncId(): 0
init: type: TickObject asyncId: 3 trigger id: 2 executionAsyncId(): 1 triggerAsyncId(): 0
before: asyncId: 3 executionAsyncId(): 3 triggerAsyncId(): 2
after: asyncId: 3 executionAsyncId(): 3 triggerAsyncId(): 2
|
 对应输出
对应输出 | init: type: TCPSERVERWRAP asyncId: 2 trigger id: 1 executionAsyncId(): 1 triggerAsyncId(): 0
|
| this[async_id_symbol] = getNewAsyncId(this._handle);
defaultTriggerAsyncIdScope(this[async_id_symbol],
process.nextTick,
emitListeningNT,
this);
|
| const asyncId = newAsyncId();
const triggerAsyncId = getDefaultTriggerAsyncId();
const tickObject = {
[async_id_symbol]: asyncId,
[trigger_async_id_symbol]: triggerAsyncId,
callback,
args
};
emitInit(asyncId, 'TickObject', triggerAsyncId, tickObject);
|
 对应输出
对应输出 | init: type: TickObject asyncId: 3 trigger id: 2 executionAsyncId(): 1 triggerAsyncId(): 0
|
| const asyncId = tock[async_id_symbol];
emitBefore(asyncId, tock[trigger_async_id_symbol]);
try {
tock.callback();
} finally {
if (destroyHooksExist())
emitDestroy(asyncId);
}
emitAfter(asyncId);
|
 对应输出
对应输出 | before: asyncId: 3 executionAsyncId(): 3 triggerAsyncId(): 2
after: asyncId: 3 executionAsyncId(): 3 triggerAsyncId(): 2
|
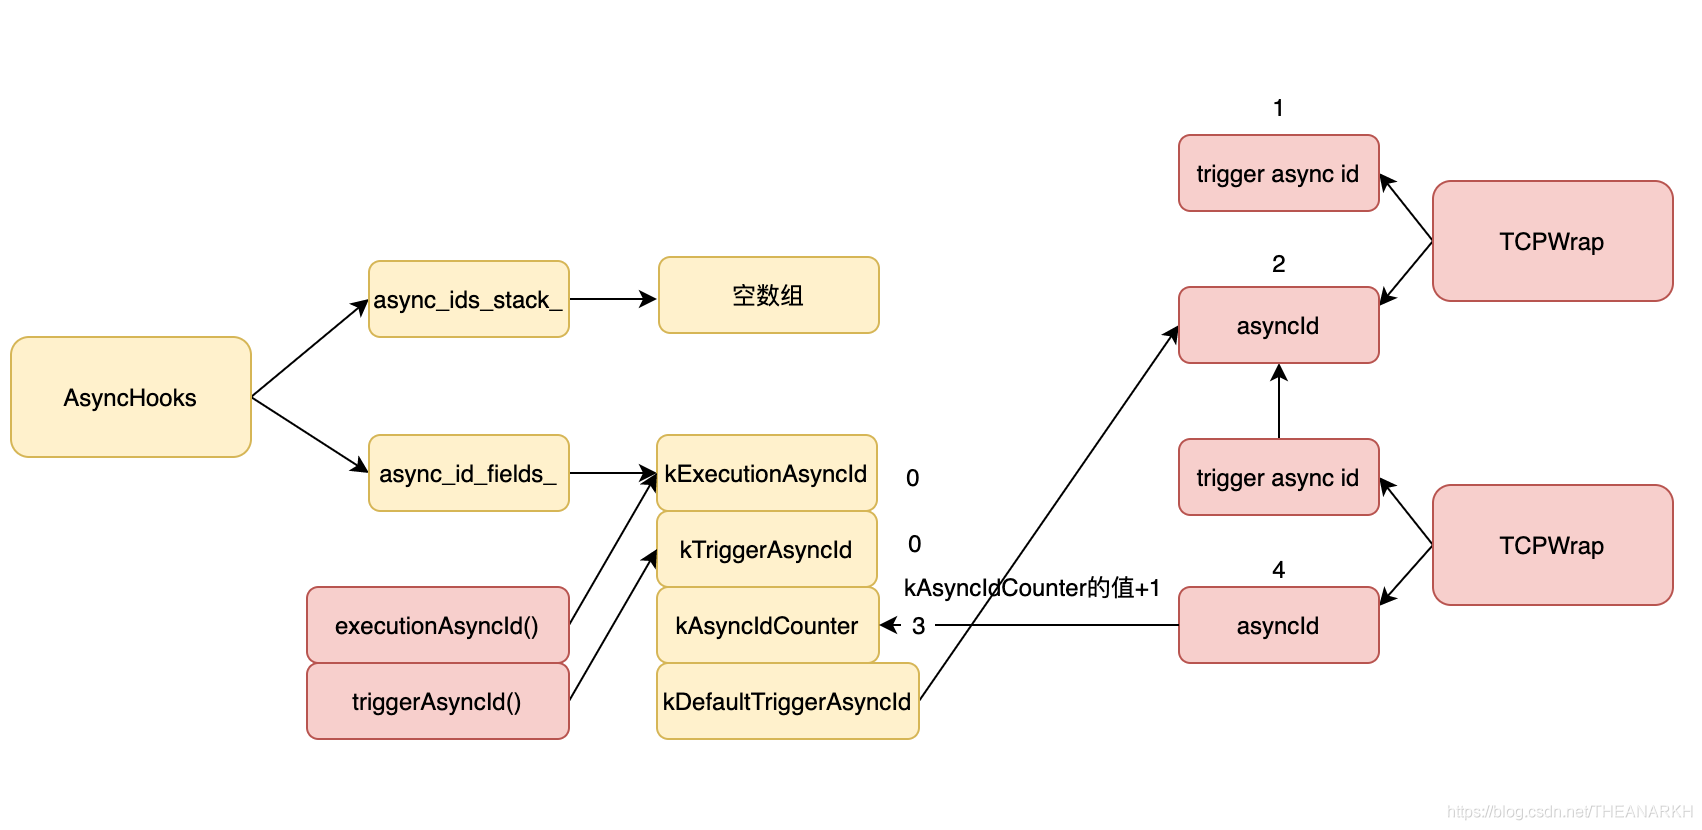
 如果这时候有一个连接建立会输出什么呢?当有连接建立时,会执行C++层的OnConnection。 OnConnection会创建一个新的TCP对象表示和客户端通信的对象。
 | MaybeLocal<Object> TCPWrap::Instantiate(Environment* env,
AsyncWrap* parent,
TCPWrap::SocketType type) {
EscapableHandleScope handle_scope(env->isolate());
AsyncHooks::DefaultTriggerAsyncIdScope trigger_scope(parent);
return handle_scope.EscapeMaybe(
constructor->NewInstance(env->context(), 1, &type_value));
}
|
 对应输出
对应输出 | init: type: TCPWRAP asyncId: 4 trigger id: 2 executionAsyncId(): 0 triggerAsyncId(): 0
|
 对应输出
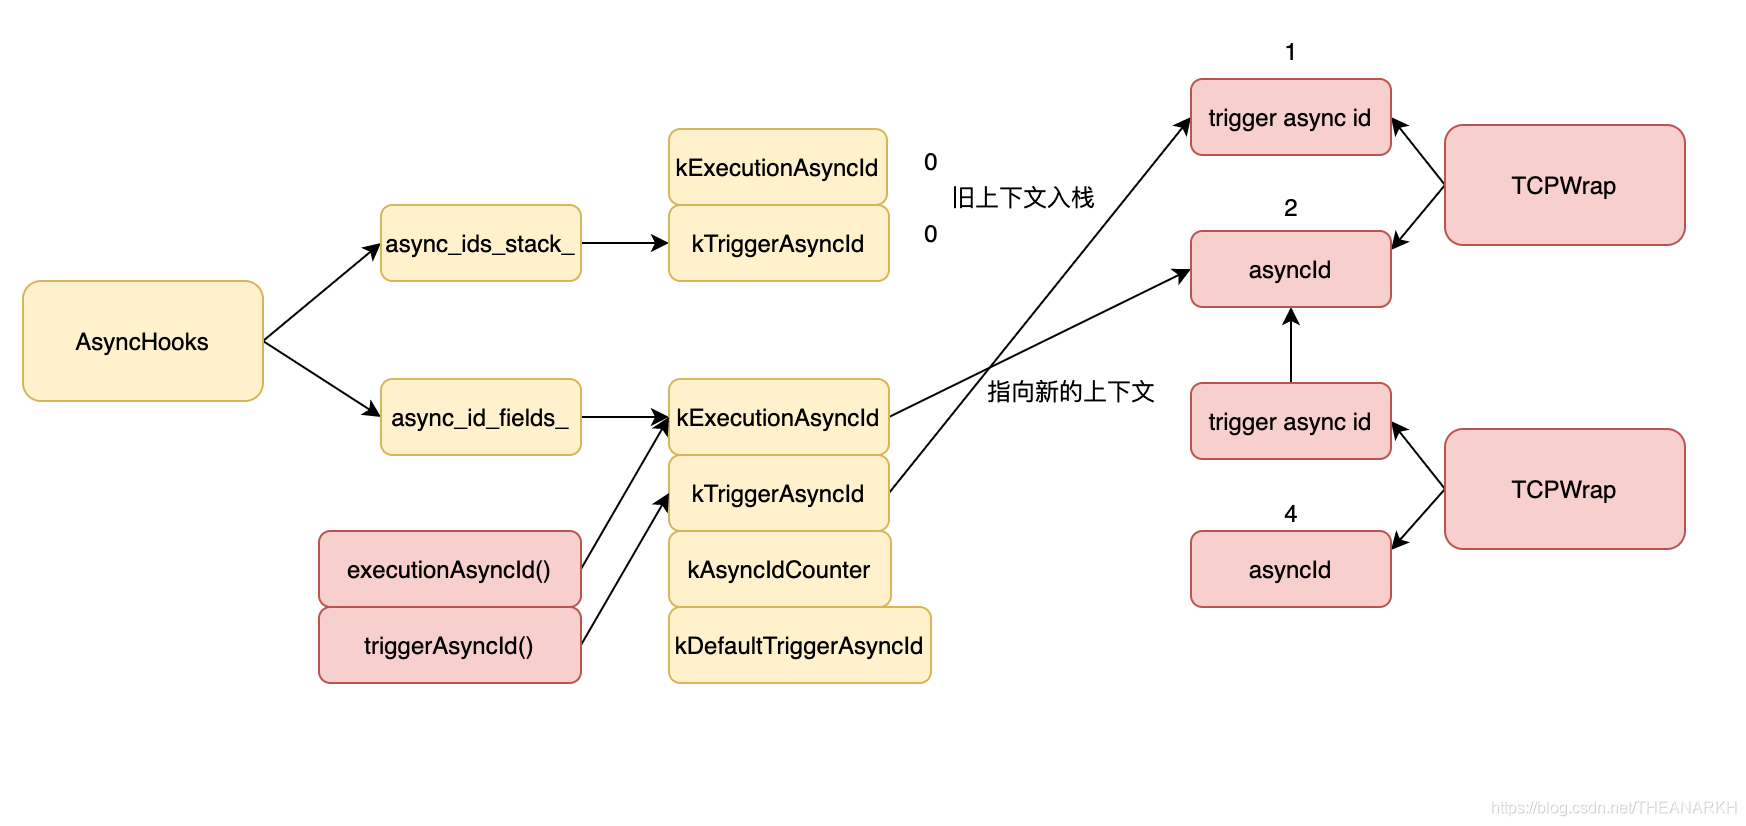
对应输出 | before: asyncId: 2 executionAsyncId(): 2 triggerAsyncId(): 1
|
| after: asyncId: 2 executionAsyncId(): 2 triggerAsyncId(): 1
|
7 AsyncResource
异步资源并不是Node.js内置的,Node.js只是提供了一套机制,业务层也可以使用。Node.js也提供了一个类给业务使用,核心代码如下。
 1
 2
 3
 4
 5
 6
 7
 8
 9
10
11
12
13
14
15
16
17
18
19
20
21
22
23
24
25
26
27
28
29
30
31
32
33
34
35
36
37
38
39
40
41
42
43
44
45
46 | class AsyncResource {
constructor(type, opts = {}) {
let triggerAsyncId = opts;
let requireManualDestroy = false;
if (typeof opts !== 'number') {
triggerAsyncId = opts.triggerAsyncId === undefined ?
getDefaultTriggerAsyncId() : opts.triggerAsyncId;
requireManualDestroy = !!opts.requireManualDestroy;
}
const asyncId = newAsyncId();
this[async_id_symbol] = asyncId;
this[trigger_async_id_symbol] = triggerAsyncId;
if (initHooksExist()) {
emitInit(asyncId, type, triggerAsyncId, this);
}
}
runInAsyncScope(fn, thisArg, ...args) {
const asyncId = this[async_id_symbol];
emitBefore(asyncId, this[trigger_async_id_symbol]);
const ret = thisArg === undefined ?
fn(...args) :
ReflectApply(fn, thisArg, args);
emitAfter(asyncId);
return ret;
}
emitDestroy() {
if (this[destroyedSymbol] !== undefined) {
this[destroyedSymbol].destroyed = true;
}
emitDestroy(this[async_id_symbol]);
return this;
}
asyncId() {
return this[async_id_symbol];
}
triggerAsyncId() {
return this[trigger_async_id_symbol];
}
}
|
| const { AsyncResource, executionAsyncId,triggerAsyncId } = require('async_hooks');
const asyncResource = new AsyncResource('Demo');
asyncResource.runInAsyncScope(() => {
console.log(executionAsyncId(), triggerAsyncId())
});
|
8 AsyncLocalStorage
AsyncLocalStorage是基于AsyncResource实现的一个维护异步逻辑中公共上下文的类。我们可以把他理解为Redis。我们看一下怎么使用。
8.1 使用
1
2
3
4
5
6
7
8
9
10
11
12
13
14 | const { AsyncLocalStorage } = require('async_hooks');
const asyncLocalStorage = new AsyncLocalStorage();
function logWithId(msg) {
const id = asyncLocalStorage.getStore();
console.log(`${id !== undefined ? id : '-'}:`, msg);
}
asyncLocalStorage.run(1, () => {
logWithId('start');
setImmediate(() => {
logWithId('finish');
});
});
|
8.2 实现
我们先看一下创建AsyncLocalStorage的逻辑
| class AsyncLocalStorage {
constructor() {
this.kResourceStore = Symbol('kResourceStore');
this.enabled = false;
}
}
|
| run(store, callback, ...args) {
// 新建一个AsyncResource
const resource = new AsyncResource('AsyncLocalStorage', defaultAlsResourceOpts);
// 通过runInAsyncScope把resource的执行上下文设置完当前的执行上下文
return resource.emitDestroy().runInAsyncScope(() => {
this.enterWith(store);
return ReflectApply(callback, null, args);
});
}
|
1
2
3
4
5
6
7
8
9
10
11
12
13
14
15
16 | enterWith(store) {
// 修改AsyncLocalStorage状态
this._enable();
// 获得当前执行上下文对于多资源,也就是run里创建的resource
const resource = executionAsyncResource();
// 把公共上下文挂载到对象上
resource[this.kResourceStore] = store;
}
_enable() {
if (!this.enabled) {
this.enabled = true;
ArrayPrototypePush(storageList, this);
storageHook.enable();
}
}
|
| getStore() {
if(this.enabled) {
const resource = executionAsyncResource();
return resource[this.kResourceStore];
}
}
|
 1
 2
 3
 4
 5
 6
 7
 8
 9
10
11
12
13
14
15
16 | const storageList = []; // AsyncLocalStorage对象数组
const storageHook = createHook({
init(asyncId, type, triggerAsyncId, resource) {
const currentResource = executionAsyncResource();
for (let i = 0; i < storageList.length; ++i) {
storageList[i]._propagate(resource, currentResource);
}
}
});
_propagate(resource, triggerResource) {
const store = triggerResource[this.kResourceStore];
if (this.enabled) {
resource[this.kResourceStore] = store;
}
}
|
 1
 2
 3
 4
 5
 6
 7
 8
 9
10
11
12
13
14
15
16 | const { AsyncLocalStorage } = require('async_hooks');
const asyncLocalStorage = new AsyncLocalStorage();
const asyncLocalStorage2 = new AsyncLocalStorage();
function logWithId(msg) {
console.log(asyncLocalStorage2.getStore());
const id = asyncLocalStorage.getStore();
console.log(`${id !== undefined ? id : '-'}:`, msg);
}
asyncLocalStorage.run(0, () => {
asyncLocalStorage2.enterWith({hello: "world"});
logWithId('start');
setImmediate(() => {
logWithId('finish');
});
});
|
| { hello: 'world' }
0: start
{ hello: 'world' }
0: finish
|
1
2
3
4
5
6
7
8
9
10
11
12 | Immediate {
_idleNext: null,
_idlePrev: null,
_onImmediate: [Function (anonymous)],
_argv: undefined,
_destroyed: true,
[Symbol(refed)]: null,
[Symbol(asyncId)]: 6,
[Symbol(triggerId)]: 2,
[Symbol(kResourceStore)]: 0,
[Symbol(kResourceStore)]: { hello: 'world' }
}
|
9 初始化时的Async hooks
| const async_hooks = require('async_hooks');
const eid = async_hooks.executionAsyncId();
const tid = async_hooks.triggerAsyncId();
console.log(eid, tid);
|
| // 获取当前的async id
function executionAsyncId() {
return async_id_fields[kExecutionAsyncId];
}
// 获取当前的trigger async id,即触发当前代码的async id
function triggerAsyncId() {
return async_id_fields[kTriggerAsyncId];
}
|
| AliasedFloat64Array async_id_fields_;
|
| typedef AliasedBufferBase<double, v8::Float64Array> AliasedFloat64Array;
|
| AliasedBufferBase(v8::Isolate* isolate, const size_t count)
: isolate_(isolate), count_(count), byte_offset_(0) {
const v8::HandleScope handle_scope(isolate_);
const size_t size_in_bytes = MultiplyWithOverflowCheck(sizeof(NativeT), count);
v8::Local<v8::ArrayBuffer> ab = v8::ArrayBuffer::New(isolate_, size_in_bytes);
// ...
}
|
| Local<ArrayBuffer> v8::ArrayBuffer::New(Isolate* isolate, size_t byte_length) {
i::Isolate* i_isolate = reinterpret_cast<i::Isolate*>(isolate);
LOG_API(i_isolate, ArrayBuffer, New);
ENTER_V8_NO_SCRIPT_NO_EXCEPTION(i_isolate);
i::MaybeHandle<i::JSArrayBuffer> result =
i_isolate->factory()->NewJSArrayBufferAndBackingStore(
byte_length, i::InitializedFlag::kZeroInitialized);
// ...
}
|
| // Whether the backing store memory is initialied to zero or not.
enum class InitializedFlag : uint8_t { kUninitialized, kZeroInitialized };
|
| {
InternalCallbackScope callback_scope(
env.get(),
Local<Object>(),
// async id和trigger async id
{ 1, 0 },
InternalCallbackScope::kAllowEmptyResource |
InternalCallbackScope::kSkipAsyncHooks);
// 执行我们的js
LoadEnvironment(env.get());
}
|
| const async_hooks = require('async_hooks');
Promise.resolve().then(() => {
const eid = async_hooks.executionAsyncId();
const tid = async_hooks.triggerAsyncId();
console.log(eid, tid);
})
|