15-Cluster
Node.js是单进程单线程的应用,这种架构带来的缺点是不能很好地利用多核的能力,因为一个线程同时只能在一个核上执行。child_process模块一定程度地解决了这个问题,child_process模块使得Node.js应用可以在多个核上执行,而cluster模块在child_process模块的基础上使得多个进程可以监听的同一个端口,实现服务器的多进程架构。本章分析cluster模块的使用和原理。
15.1 cluster使用例子
我们首先看一下cluster的一个使用例子。
 1
 2
 3
 4
 5
 6
 7
 8
 9
10
11
12
13
14 | const cluster = require('cluster');
const http = require('http');
const numCPUs = require('os').cpus().length;
if (cluster.isMaster) {
for (let i = 0; i < numCPUs; i++) {
cluster.fork();
}
} else {
http.createServer((req, res) => {
res.writeHead(200);
res.end('hello world\n');
}).listen(8888);
}
|
以上代码在第一次执行的时候,cluster.isMaster为true,说明是主进程,然后通过fork调用创建一个子进程,在子进程里同样执行以上代码,但是cluster.isMaster为false,从而执行else的逻辑,我们看到每个子进程都会监听8888这个端口但是又不会引起EADDRINUSE错误。下面我们来分析一下具体的实现。
15.2 主进程初始化
我们先看主进程时的逻辑。我们看一下require(‘cluster’)的时候,Node.js是怎么处理的。
| const childOrMaster = 'NODE_UNIQUE_ID' in process.env ? 'child' : 'master';
module.exports = require(`internal/cluster/${childOrMaster}`)
|
我们看到Node.js会根据当前环境变量的值加载不同的模块,后面我们会看到NODE_UNIQUE_ID是主进程给子进程设置的,在主进程中,NODE_UNIQUE_ID是不存在的,所以主进程时,会加载master模块。
1
2
3
4
5
6
7
8
9
10
11
12
13
14
15
16
17
18
19
20
21
22
23
24
25
26
27
28
29
30
31
32
33
34 | cluster.isWorker = false;
cluster.isMaster = true;
// 调度策略
cluster.SCHED_NONE = SCHED_NONE;
cluster.SCHED_RR = SCHED_RR;
// 调度策略的选择
let schedulingPolicy = {
'none': SCHED_NONE,
'rr': SCHED_RR
}[process.env.NODE_CLUSTER_SCHED_POLICY];
if (schedulingPolicy === undefined) {
schedulingPolicy = (process.platform === 'win32') ?
SCHED_NONE : SCHED_RR;
}
cluster.schedulingPolicy = schedulingPolicy;
// 创建子进程
cluster.fork = function(env) {
// 参数处理
cluster.setupMaster();
const id = ++ids;
// 调用child_process模块的fork
const workerProcess = createWorkerProcess(id, env);
const worker = new Worker({
id: id,
process: workerProcess
});
// ...
worker.process.on('internalMessage', internal(worker, onmessage));
process.nextTick(emitForkNT, worker);
cluster.workers[worker.id] = worker;
return worker;
};
|
cluster.fork是对child_process模块fork的封装,每次cluster.fork的时候,就会新建一个子进程,所以cluster下面会有多个子进程,Node.js提供的工作模式有轮询和共享两种,下面会具体介绍。Worker是对子进程的封装,通过process持有子进程的实例,并通过监听internalMessage和message事件完成主进程和子进程的通信,internalMessage这是Node.js定义的内部通信事件,处理函数是internal(worker, onmessage)。我们先看一下internal。
1
2
3
4
5
6
7
8
9
10
11
12
13
14
15
16
17
18
19
20
21
22 | const callbacks = new Map();
let seq = 0;
function internal(worker, cb) {
return function onInternalMessage(message, handle) {
if (message.cmd !== 'NODE_CLUSTER')
return;
let fn = cb;
if (message.ack !== undefined) {
const callback = callbacks.get(message.ack);
if (callback !== undefined) {
fn = callback;
callbacks.delete(message.ack);
}
}
fn.apply(worker, arguments);
};
}
|
internal函数对异步消息通信做了一层封装,因为进程间通信是异步的,当我们发送多个消息后,如果收到一个回复,我们无法辨别出该回复是针对哪一个请求的,Node.js通过seq的方式对每一个请求和响应做了一个编号,从而区分响应对应的请求。接着我们看一下message的实现。
1
2
3
4
5
6
7
8
9
10
11
12
13
14 | function onmessage(message, handle) {
const worker = this;
if (message.act === 'online')
online(worker);
else if (message.act === 'queryServer')
queryServer(worker, message);
else if (message.act === 'listening')
listening(worker, message);
else if (message.act === 'exitedAfterDisconnect')
exitedAfterDisconnect(worker, message);
else if (message.act === 'close')
close(worker, message);
}
|
onmessage根据收到消息的不同类型进行相应的处理。后面我们再具体分析。至此,主进程的逻辑就分析完了。
15.3 子进程初始化
我们来看一下子进程的逻辑。当执行子进程时,会加载child模块。
1
2
3
4
5
6
7
8
9
10
11
12
13
14
15
16
17
18
19
20
21
22
23
24
25
26
27
28
29
30
31
32 | const cluster = new EventEmitter();
const handles = new Map();
const indexes = new Map();
const noop = () => {};
module.exports = cluster;
cluster.isWorker = true;
cluster.isMaster = false;
cluster.worker = null;
cluster.Worker = Worker;
cluster._setupWorker = function() {
const worker = new Worker({
id: +process.env.NODE_UNIQUE_ID | 0,
process: process,
state: 'online'
});
cluster.worker = worker;
process.on('internalMessage', internal(worker, onmessage));
// 通知主进程子进程启动成功
send({ act: 'online' });
function onmessage(message, handle) {
if (message.act === 'newconn')
onconnection(message, handle);
else if (message.act === 'disconnect')
_disconnect.call(worker, true);
}
};
|
_setupWorker函数在子进程初始化时被执行,和主进程类似,子进程的逻辑也不多,监听internalMessage事件,并且通知主线程自己启动成功。
15.4 http.createServer的处理
主进程和子进程执行完初始化代码后,子进程开始执行业务代码http.createServer,在HTTP模块章节我们已经分析过http.createServer的过程,这里就不具体分析,我们知道http.createServer最后会调用net模块的listen,然后调用listenIncluster。我们从该函数开始分析。
1
2
3
4
5
6
7
8
9
10
11
12
13
14
15
16
17
18
19
20
21
22
23
24
25
26
27
28
29
30
31
32 | function listenIncluster(server, address, port, addressType,
backlog, fd, exclusive, flags) {
const serverQuery = {
address: address,
port: port,
addressType: addressType,
fd: fd,
flags,
};
cluster._getServer(server, serverQuery, listenOnMasterHandle);
function listenOnMasterHandle(err, handle) {
err = checkBindError(err, port, handle);
if (err) {
const ex = exceptionWithHostPort(err,
'bind',
address,
port);
return server.emit('error', ex);
}
server._handle = handle;
server._listen2(address,
port,
addressType,
backlog,
fd,
flags);
}
}
|
listenIncluster函数会调用子进程cluster模块的_getServer。
1
2
3
4
5
6
7
8
9
10
11
12
13
14
15
16
17
18
19
20
21
22 | cluster._getServer = function(obj, options, cb) {
let address = options.address;
// 忽略index的处理逻辑
const message = {
act: 'queryServer',
index,
data: null,
...options
};
message.address = address;
// 给主进程发送消息
send(message, (reply, handle) => {
// 根据不同模式做处理
if (handle)
shared(reply, handle, indexesKey, cb);
else
rr(reply, indexesKey, cb);
});
};
|
_getServer会给主进程发送一个queryServer的请求。我们看一下send函数。
1
2
3
4
5
6
7
8
9
10
11
12
13
14
15
16 | function send(message, cb) {
return sendHelper(process, message, null, cb);
}
function sendHelper(proc, message, handle, cb) {
if (!proc.connected)
return false;
message = { cmd: 'NODE_CLUSTER', ...message, seq };
if (typeof cb === 'function')
callbacks.set(seq, cb);
seq += 1;
return proc.send(message, handle);
}
|
send调用了sendHelper,sendHelper是对异步请求做了一个封装,我们看一下主进程是如何处理queryServer请求的。
 1
 2
 3
 4
 5
 6
 7
 8
 9
10
11
12
13
14
15
16
17
18
19
20
21
22
23
24
25
26
27
28
29
30
31
32
33
34 | function queryServer(worker, message) {
const key = `${message.address}:${message.port}:${message.addressType}:` + `${message.fd}:${message.index}`;
let handle = handles.get(key);
if (handle === undefined) {
let address = message.address;
let constructor = RoundRobinHandle;
// 根据策略选取不同的构造函数
if (schedulingPolicy !== SCHED_RR ||
message.addressType === 'udp4' ||
message.addressType === 'udp6') {
constructor = SharedHandle;
}
handle = new constructor(key,
address,
message.port,
message.addressType,
message.fd,
message.flags);
handles.set(key, handle);
}
handle.add(worker, (errno, reply, handle) => {
const { data } = handles.get(key);
send(worker, {
errno,
key,
ack: message.seq,
data,
...reply
}, handle);
});
}
|
queryServer首先根据调度策略选择构造函数,然后执行对应的add方法并且传入一个回调。下面我们看看不同模式下的处理。
15.5 共享模式
下面我们首先看一下共享模式的处理,逻辑如图19-1所示。
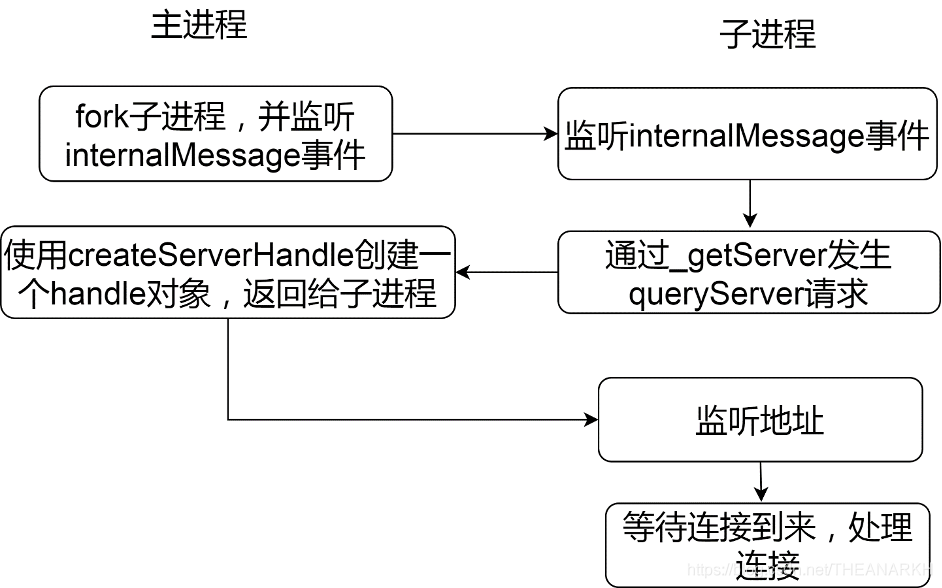
图19-1
 1
 2
 3
 4
 5
 6
 7
 8
 9
10
11
12
13
14
15
16
17
18
19
20
21
22
23
24
25 | function SharedHandle(key, address, port, addressType, fd, flags) {
this.key = key;
this.workers = [];
this.handle = null;
this.errno = 0;
let rval;
if (addressType === 'udp4' || addressType === 'udp6')
rval = dgram._createSocketHandle(address,
port,
addressType,
fd,
flags);
else
rval = net._createServerHandle(address,
port,
addressType,
fd,
flags);
if (typeof rval === 'number')
this.errno = rval;
else
this.handle = rval;
}
|
SharedHandle是共享模式,即主进程创建好handle,交给子进程处理。
| SharedHandle.prototype.add = function(worker, send) {
this.workers.push(worker);
send(this.errno, null, this.handle);
};
|
SharedHandle的add把SharedHandle中创建的handle返回给子进程,接着我们看看子进程拿到handle后的处理
 1
 2
 3
 4
 5
 6
 7
 8
 9
10
11
12
13
14
15 | function shared(message, handle, indexesKey, cb) {
const key = message.key;
const close = handle.close;
handle.close = function() {
send({ act: 'close', key });
handles.delete(key);
indexes.delete(indexesKey);
return close.apply(handle, arguments);
};
handles.set(key, handle);
// 执行net模块的回调
cb(message.errno, handle);
}
|
Shared函数把接收到的handle再回传到调用方。即net模块。net模块会执行listen开始监听地址,但是有连接到来时,系统只会有一个进程拿到该连接。所以所有子进程存在竞争关系导致负载不均衡,这取决于操作系统的实现。 共享模式实现的核心逻辑主进程在_createServerHandle创建handle时执行bind绑定了地址(但没有listen),然后通过文件描述符传递的方式传给子进程,子进程执行listen的时候就不会报端口已经被监听的错误了。因为端口被监听的错误是执行bind的时候返回的。
15.6 轮询模式
接着我们看一下RoundRobinHandle的处理,逻辑如图19-2所示。
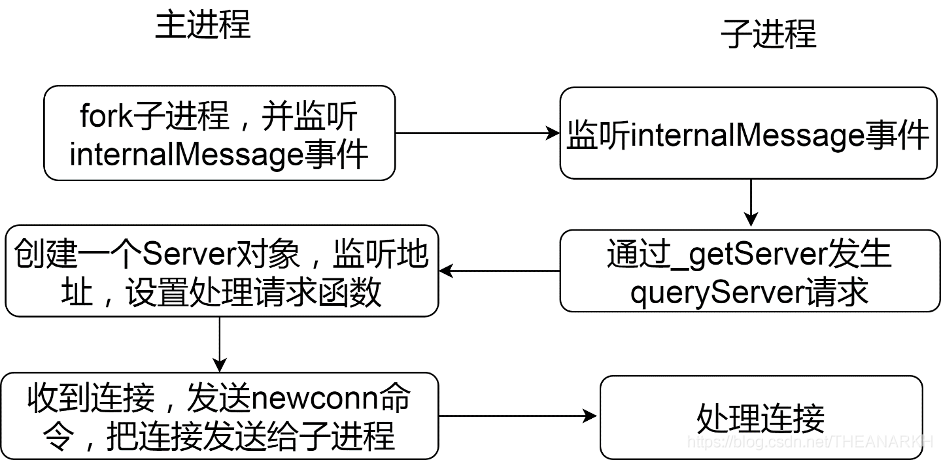
图19-2
1
2
3
4
5
6
7
8
9
10
11
12
13
14
15
16
17
18
19
20
21
22
23
24
25
26 | function RoundRobinHandle(key, address, port, addressType, fd, flags) {
this.key = key;
this.all = new Map();
this.free = [];
this.handles = [];
this.handle = null;
this.server = net.createServer(assert.fail);
if (fd >= 0)
this.server.listen({ fd });
else if (port >= 0) {
this.server.listen({
port,
host: address,
ipv6Only: Boolean(flags & constants.UV_TCP_IPV6ONLY),
});
} else
this.server.listen(address); // UNIX socket path.
// 监听成功后,注册onconnection回调,有连接到来时执行
this.server.once('listening', () => {
this.handle = this.server._handle;
this.handle.onconnection = (err, handle) => this.distribute(err, handle);
this.server._handle = null;
this.server = null;
});
}
|
RoundRobinHandle的工作模式是主进程负责监听,收到连接后分发给子进程。我们看一下RoundRobinHandle的add
1
2
3
4
5
6
7
8
9
10
11
12
13
14
15
16
17
18
19
20
21
22
23
24 | RoundRobinHandle.prototype.add = function(worker, send) {
this.all.set(worker.id, worker);
const done = () => {
if (this.handle.getsockname) {
const out = {};
this.handle.getsockname(out);
send(null, { sockname: out }, null);
} else {
send(null, null, null); // UNIX socket.
}
// In case there are connections pending.
this.handoff(worker);
};
// 说明listen成功了
if (this.server === null)
return done();
// 否则等待listen成功后执行回调
this.server.once('listening', done);
this.server.once('error', (err) => {
send(err.errno, null);
});
};
|
RoundRobinHandle会在listen成功后执行回调。我们回顾一下执行add函数时的回调。
| handle.add(worker, (errno, reply, handle) => {
const { data } = handles.get(key);
send(worker, {
errno,
key,
ack: message.seq,
data,
...reply
}, handle);
});
|
回调函数会把handle等信息返回给子进程。但是在RoundRobinHandle和SharedHandle中返回的handle是不一样的。分别是null和net.createServer实例。接着我们回到子进程的上下文。看子进程是如何处理响应的。刚才我们讲过,不同的调度策略,返回的handle是不一样的,我们看轮询模式下的处理。
1
2
3
4
5
6
7
8
9
10
11
12
13
14
15
16
17
18
19
20 | function rr(message, indexesKey, cb) {
let key = message.key;
function listen(backlog) {
return 0;
}
function close() {
// ...
}
const handle = { close, listen, ref: noop, unref: noop };
if (message.sockname) {
handle.getsockname = getsockname; // TCP handles only.
}
handles.set(key, handle);
// 执行net模块的回调
cb(0, handle);
}
|
round-robin模式下,构造一个假的handle返回给调用方,因为调用方会调用这些函数。最后回到net模块。net模块首先保存handle,然后调用listen函数。当有请求到来时,round-bobin模块会执行distribute分发请求给子进程。
 1
 2
 3
 4
 5
 6
 7
 8
 9
10
11
12
13
14
15
16
17
18
19
20
21
22
23
24
25
26
27
28
29
30
31
32 | RoundRobinHandle.prototype.distribute = function(err, handle) {
// 首先保存handle到队列
this.handles.push(handle);
// 从空闲队列获取一个子进程
const worker = this.free.shift();
// 分发
if (worker)
this.handoff(worker);
};
RoundRobinHandle.prototype.handoff = function(worker) {
// 拿到一个handle
const handle = this.handles.shift();
// 没有handle,则子进程重新入队
if (handle === undefined) {
this.free.push(worker); // Add to ready queue again.
return;
}
// 通知子进程有新连接
const message = { act: 'newconn', key: this.key };
sendHelper(worker.process, message, handle, (reply) => {
// 接收成功
if (reply.accepted)
handle.close();
else
// 结束失败,则重新分发
this.distribute(0, handle); // Worker is shutting down. Send to another.
this.handoff(worker);
});
};
|
接着我们看一下子进程是怎么处理该请求的。
 1
 2
 3
 4
 5
 6
 7
 8
 9
10
11
12
13
14
15
16 | function onmessage(message, handle) {
if (message.act === 'newconn')
onconnection(message, handle);
}
function onconnection(message, handle) {
const key = message.key;
const server = handles.get(key);
const accepted = server !== undefined;
// 回复接收成功
send({ ack: message.seq, accepted });
if (accepted)
// 在net模块设置
server.onconnection(0, handle);
}
|
我们看到子进程会执行server.onconnection,这个和我们分析net模块时触发onconnection事件是一样的。
15.7实现自己的cluster模块
Node.js的cluster在请求分发时是按照轮询的,无法根据进程当前情况做相应的处理。了解了cluster模块的原理后,我们自己来实现一个cluster模块。
15.7.1 轮询模式
整体架构如图15-3所示。
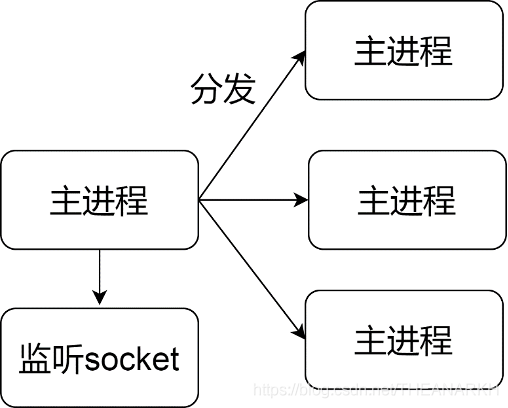
图15-3
Parent.js
1
2
3
4
5
6
7
8
9
10
11
12
13
14
15 | const childProcess = require('child_process');
const net = require('net');
const workers = [];
const workerNum = 10;
let index = 0;
for (let i = 0; i < workerNum; i++) {
workers.push(childProcess.fork('child.js', {env: {index: i}}));
}
const server = net.createServer((client) => {
workers[index].send(null, client);
console.log('dispatch to', index);
index = (index + 1) % workerNum;
});
server.listen(11111);
|
child.js
| process.on('message', (message, client) => {
console.log('receive connection from master');
});
|
主进程负责监听请求,主进程收到请求后,按照一定的算法把请求通过文件描述符的方式传给worker进程,worker进程就可以处理连接了。在分发算法这里,我们可以根据自己的需求进行自定义,比如根据当前进程的负载,正在处理的连接数。
15.7.2 共享模式
整体架构如图15-4所示。
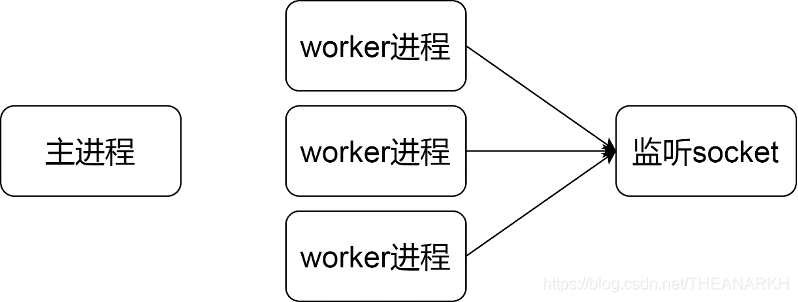
图15-4
Parent.js
 1
 2
 3
 4
 5
 6
 7
 8
 9
10
11
12
13
14
15
16 | const childProcess = require('child_process');
const net = require('net');
const workers = [];
const workerNum = 10 ;
const handle = net._createServerHandle('127.0.0.1', 11111, 4);
for (let i = 0; i < workerNum; i++) {
const worker = childProcess.fork('child.js', {env: {index: i}});
workers.push(worker);
worker.send(null ,handle);
/*
防止文件描述符泄漏,但是重新fork子进程的时候就无法
再传递了文件描述符了
*/
handle.close();
}
|
Child.js
| const net = require('net');
process.on('message', (message, handle) => {
net.createServer(() => {
console.log(process.env.index, 'receive connection');
}).listen({handle});
});
|
我们看到主进程负责绑定端口,然后把handle传给worker进程,worker进程各自执行listen监听socket。当有连接到来的时候,操作系统会选择某一个worker进程处理该连接。我们看一下共享模式下操作系统中的架构,如图15-5所示。
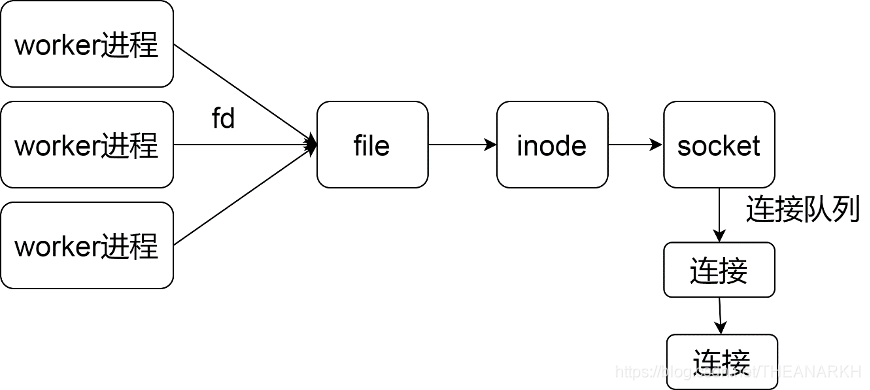
图15-5
实现共享模式的重点在于理解EADDRINUSE错误是怎么来的。当主进程执行bind的时候,结构如图15-6所示。

图15-6
如果其它进程也执行bind并且端口也一样,则操作系统会告诉我们端口已经被监听了(EADDRINUSE)。但是如果我们在子进程里不执行bind的话,就可以绕过这个限制。那么重点在于,如何在子进程中不执行bind,但是又可以绑定到同样的端口呢?有两种方式。 1 fork 我们知道fork的时候,子进程会继承主进程的文件描述符,如图15-7所示。

图15-7
这时候,主进程可以执行bind和listen,然后fork子进程,最后close掉自己的fd,让所有的连接都由子进程处理就行。但是在Node.js中,我们无法实现,所以这种方式不能满足需求。 2 文件描述符传递 Node.js的子进程是通过fork+exec模式创建的,并且Node.js文件描述符设置了close_on_exec标记,这就意味着,在Node.js中,创建子进程后,文件描述符的结构体如图15-8所示(有标准输入、标准输出、标准错误三个fd)。
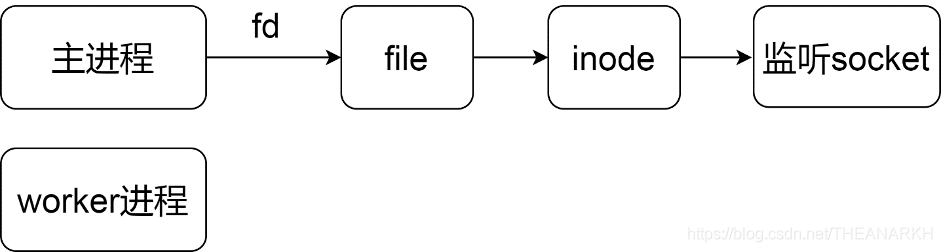
图15-8
这时候我们可以通过文件描述符传递的方式。把方式1中拿不到的fd传给子进程。因为在Node.js中,虽然我们拿不到fd,但是我们可以拿得到fd对应的handle,我们通过IPC传输handle的时候,Node.js会为我们处理fd的问题。最后通过操作系统对传递文件描述符的处理。结构如图15-9所示。
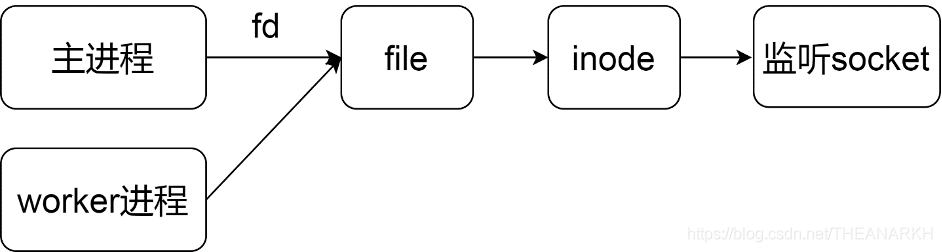
图15-9
通过这种方式,我们就绕过了bind同一个端口的问题。通过以上的例子,我们知道绕过bind的问题重点在于让主进程和子进程共享socket而不是单独执行bind。对于传递文件描述符,Node.js中支持很多种方式。上面的方式是子进程各自执行listen。还有另一种模式如下 parent.js
 1
 2
 3
 4
 5
 6
 7
 8
 9
10
11
12
13 | const childProcess = require('child_process');
const net = require('net');
const workers = [];
const workerNum = 10;
const server = net.createServer(() => {
console.log('master receive connection');
})
server.listen(11111);
for (let i = 0; i < workerNum; i++) {
const worker = childProcess.fork('child.js', {env: {index: i}});
workers.push(worker);
worker.send(null, server);
}
|
child.js
| const net = require('net');
process.on('message', (message, server) => {
server.on('connection', () => {
console.log(process.env.index, 'receive connection');
})
});
|
上面的方式中,主进程完成了bind和listen。然后把server实例传给子进程,子进程就可以监听连接的到来了。这时候主进程和子进程都可以处理连接。 最后写一个客户端测试。 客户端
| const net = require('net');
for (let i = 0; i < 50; i++) {
net.connect({port: 11111});
}
|
执行client我们就可以看到多进程处理连接的情况。